


Here are some other images from the shoot that I haven’t decided will be in the collection yet….I think at least one of them will…


Update (June 6, 2015)
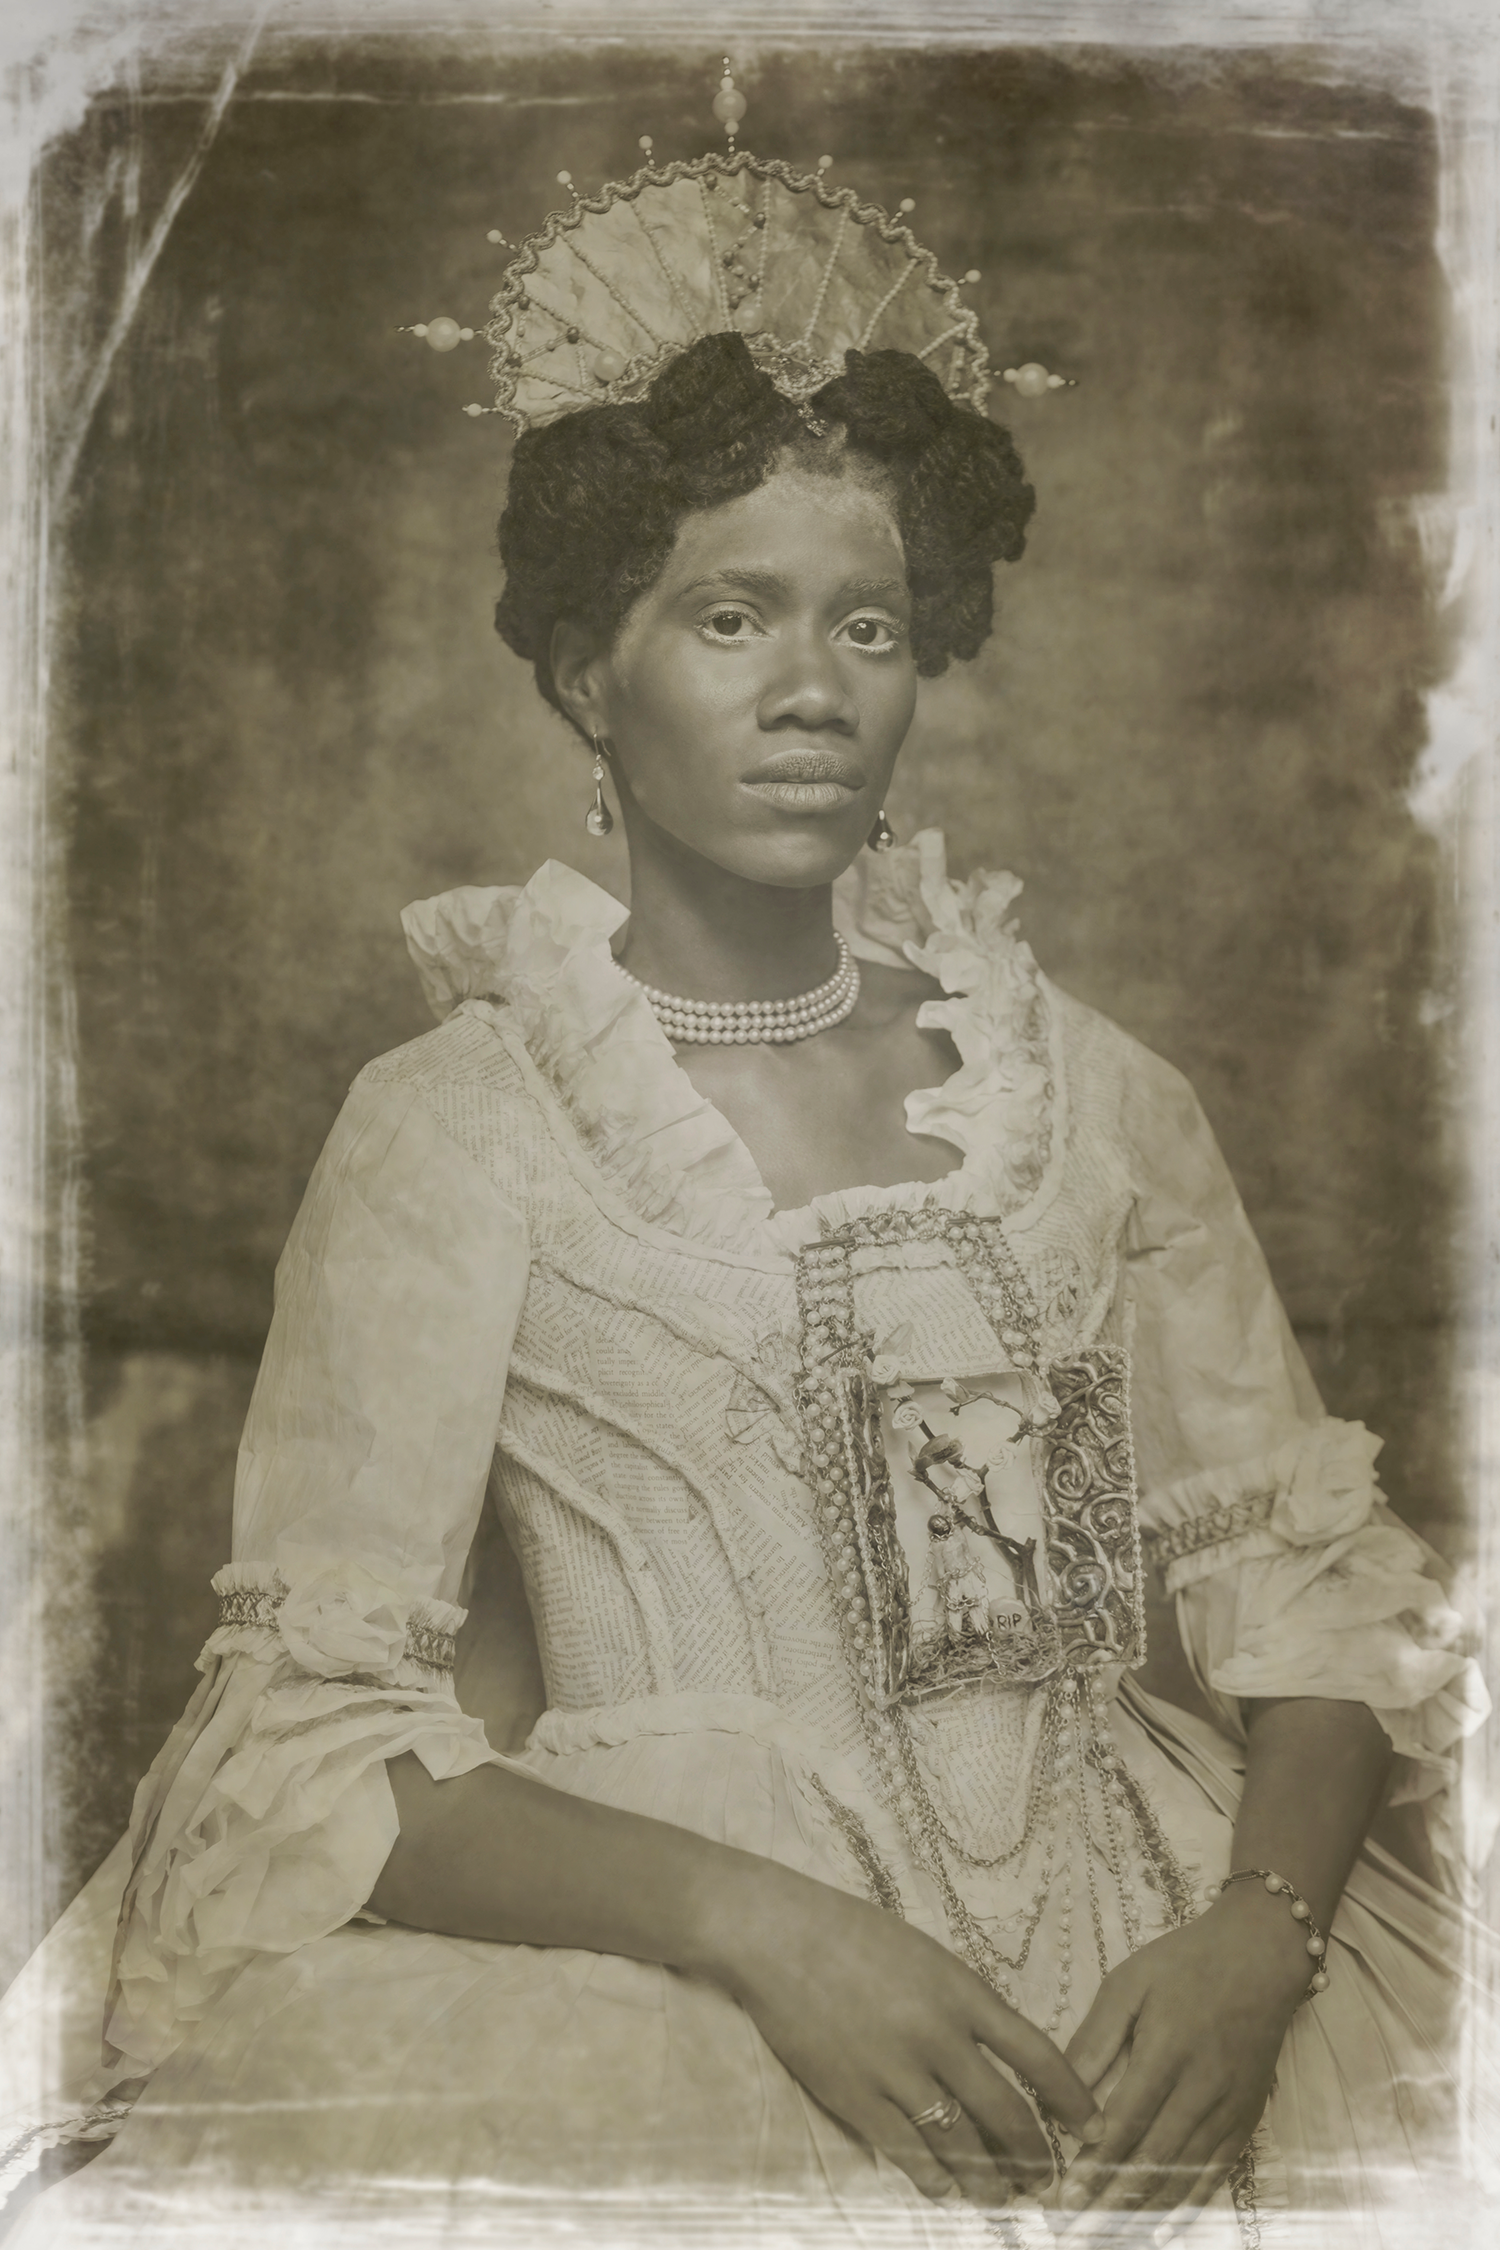
I actually decided to include a black & white image for each sequence in the series so, I chose one from the group I was considering (above). I am even more excited with this since, I feel it pushes the series to a place I feel is necessary.
Watch the behind the scenes (in HD)!
The paper gown…my oh my, that paper gown…I don’t even know where to start. I guess I’ll start with where I got the idea. I’ve always wanted to make the beautiful gowns I grew up seeing in the old master paintings. Once, I even priced what it would cost to purchase the fabric and other supplies to make one. I quickly came to the conclusion that it would be much too expensive for me – especially if I wanted to make a few of them for a collection. It wasn’t until I had wrapped up shooting on the BWC project that the idea of how to make so many and for what purpose, came to me.
One morning, I awoke to the sounds of horrible news on the t.v.. It was about another innocent Brown/Black person that had been murdered by police. I was upset, sad, and a well of emotions. Most of all, I was tired. So many years of my people living like this – being treated like this. I said out loud, ‘I wish we could rewrite history. I wonder what our experience as a people would have been had we been treated equally. What if I grew up looking at master paintings that featured black subjects – royals, instead?’ As soon as I said it, I knew what my series would be and what I would be spending the next year on – more if need. As soon as I said the words, I knew the dresses had to be made out of paper.
The process began quickly. I experimented with 3 different types of paper before I decided on the base type I would use for the entire series. I picked up rolls of the paper at the local art store and began the bust of the dress that very same day. I wanted the bust to be hard and sturdy so that it could carry the weight of the rest of the dress. At first, I was determined to make every single detail out of paper but, once I took a test shot of the mostly completed dress, I realized that some details would be lost on camera – especially the way I was going to shoot. I then made exceptions and felt much better about the decision. Aside from the strip of gold trim the runs along the paper ruffles, the door panels, and display details inside the chest, the dress is all paper. The crown is also made out of paper mache, faux beads, wire, and trimmings. In the end, it took me 3 weeks to complete the gown, and headpiece. It is still very hard to believe that I didn’t draw one sketch for any of it throughout the process.

I’d been wanting to shoot in a new location for quite some time however, I decided to shoot in the beautiful park near my home once again. There are still a few places that I haven’t used. The trouble with the park for this particular series was however, I didn’t want just green leaves in the background for every shot. Instead, details like those seen in the time periods between the 15th – 19th centuries were also wanted. I took a stroll the morning before the shoot (I know – very last minute) and searched the park for elements that would make the images look dated. I didn’t have to search hard or too long. I found a wonderful archway with columns that I thought would work perfectly for the space I wanted to create. The other bonus was, The lighting would be amazing since, I could control the amount of light hitting my model by just moving my set and her, further back under the overhead. I also found a beautiful leafy area that worked for another concept I had in mind (image posted below – “Amina’s Child”).
To make the space work, I realized that I would need a backdrop – not only to hide the other end of the overpass but also, to create an environment for the story. Instead of paying $300 for a canvas one, I made my own using muslin (7 yd worth for $28.00) then tie dyed it black. I also went to Homedepot and purchased a few feet of pvc piping and some joints to build the stand.

Once the backdrop was taken care of, I focused on the other elements like hints of color and little details to bring the set to life. I purchased yards of inexpensive red fabrics. One was a deep red (for draping), and the other had gold embroidery (used for the “carpet”). I also made faux doors out of foam. The images below show a bit of the process as I drew the shapes to be cut out, then painted several layers to get the desired effect.

The night before the shoot, I stayed up late to paint the door panels, make candle holders using glass cups from my home, pack everything, and mentally prepare for what was to come. I was a ball of anxiety since, I really didn’t know what to expect and how my ideas would translate to the images. All the hard work needed to be for something. The images needed to be beautiful. I also hadn’t practiced the setup of the backdrop and the props so, my nerves were extremely high. By the morning of the shoot, I had only slept for 3 hrs (8 hrs total in a 3 day span). Instead of being completely out of my mind, I felt good and ready to go (perhaps a sign of being completely out of my mind). I even made a boat and scroll as additional props. This made me late and in the end, I wound up not using them.
By the time I dashed to pick up my model, Deborah, and head back, the rest of the team, Kori and Azua (and her daughter) were already at my place waiting. It was 12 p.m. (an hr later than I originally planned). We packed both cars with set supplies then, I turned my attention to the huge paper gown that had only spent its life on a mannequin – not laying down in a hatchback. I think I started to sweat at this point. After figuring out this huge challenge, we were off!
I knew the night before that I would use two different locations in the park. One set was about .5 miles into the park and the other closer to the entrance. The first area that we set up was more secluded than the second. I chose it because of that fact and, I had an idea to have Deborah look as though she had been sleeping under leaves for a long time. The aesthetic for this image would be very different than the others because, I wanted her to look as though she belonged to the spirit world and more like a painting. For me, this was like the beginning of the story: The spirit of Amina’s Child has been shaken by the ancestors because, they want her to reenter the world of the living. They want her to walk in many bodies until history has been rewritten…until things change. The concept was to have the painting turn into a reality – which is why all the others images look like actual photographs.

In total, me and the crew: Azua, Deborah, Kori, and Mina, carried two cars worth of stuff in 4 trips. Our first shoot with Deborah went smoothly but by the time we were ready to pack up and move on to the next location, we were all tired. Upon arriving to the columns for “The Crowning of Amina II” shoot, sleep deprivation was definitely creeping in, and I began to feel a little lost. Remember, I hadn’t practiced the setup so, I didn’t know where I was going to put anything (though I had a general idea), nor did I know how Deborah was going to look in the space. I decided to breathe, and allow my organic creativity take control. Once I did, I remembered all the material I had referenced over the past year. I knew what to do.
So many people came to see what we were doing and to view the gown. The reviews were amazing to the point where, I knew that I would some how have to find a way to exhibit all of the dresses alongside their photographs. I was feeling my second…or 15th wind again when, a gust of wind swept through the area where we were setting up and sent the mannequin (with the gown) down to the ground but, not before taking down the entire candle setup I had propped to sit behind Deborah. Yep. The costume took a hard hit and was laying face down on the ground while, glass shattered everywhere! All I could do was drop my jaw in complete surprise and cover my eyes. The entire crew was so shaken that, it seemed that no one wanted to pickup the gown and see what damage had been done. I ran over to do it when Kori yelled that, “She’s alright! No!!! We have a tear!”. My heart sank and I nearly cried. I ran around to find that a small but very noticeable tear was at the bottom of the train. Thank goodness for a great team and quick whits! I pulled out my trusty duck tape and mended the tear from the inside. While I did that, Kori picked up the shattered pieces of glass from the cups that had been holding the candles.
At this point, we were all completely exhausted and being eaten by mosquitoes (though we didn’t realize it yet). We were finally ready to take the first shot at 6:35 p.m.. I felt like I was getting ready to photograph the class of 1999! It was all very exciting and surreal! The video shows me nearly collapsing in Azua’s arms upon taking the last shot of the evening.
To date, this is the longest blog I have ever written…I guess, because I see this more as my journal, it seems fitting. Unlike other projects I’ve worked on, I’d like to have notes on the entire journey of “Rewriting History”…especially since I plan to let it consume me for some time. Thanks so much for reading this…if you were able to make it through.
XO

Awesome work. Thank you for sharing your talent. It is always a pleasure to be a part of your journey. Appreciate the Black Witch Chronicles project that introduced me to you and your work. Looking forward to great things. Blessings, Light and Love to you, Fabiola
Thank you Kori for taking part in t his project and capturing moments that were so integral to the process! XOXO
My day would have been different had I not experienced this reimagining of royalty, this rare and subtle beauty. Thank you.
That you dear Lisha! I appreciate you.
This. Genius. Stunning. I came across your article on facebook. I was moved by the photo’s beauty. I paused immediately to read. Nothing prepared me for the discovery that the dresses and objects used were largely paper and inexpensive materials used brilliantly. Congratulations on the success of a magnificent project. Thank you, for sharing each step of your creative process, it was appreciated and enjoyed. I was so moved by your work I’ve shared it with my many networks of family, friends, colleagues and social media. I wanted everyone to experience the same joy and wonder. Your work is far too important to not be recognized. This calls for a major exhibition. I’m now following your blog and will read all that I’ve missed previously. Continued success in all present and future endeavors. Lorraine Currelley, Exec. Dir. Poets Network & Exchange, Inc.
My heart is heavy with love, gratitude, and happiness that you were affected by my work in such a way. I have no words to express my level of thanks for you taking the time to read, view, share, and reach out. Thank you so much…xx
My honor. My joy.
Reblogged this on The Currelley Literary Journal.
I spend a pretty good portion of my time on the web. As you know, you can lost out here for days. I’m not really even sure how I landed here but I’m so very glad to have stumbled on your bit of awesomeness. I’m in LOVE! Your work is soul nourishing…inspiring. Paper and a creative mind!
Hi Belinda! Lol so true about the web! Thanks for stopping by and taking the time to read my journal entry. Your words mean a lot to me.
I am working on a few commissioned works right now so, there’s been a short pause for the next paper dress but, it’s coming. If you’d like to know more about my work and what I’m regularly up to, please also visit my Facebook page @:
http://www.facebook.com/fabiolajlphotography
Fabiola
Xx
heritage in a new form and refreshing! thank you for sharing your gift, yourself with us !
Thank you for reading my post and sharing your wonderful comment!